Whenever you are deploying an application to a production server it's good practice to create a dedicated account for the application. This gives you a much greater level of control over the security of the application and helps maintain a level of separation between the application and other services and software that may be running on the server. To create an account for the tennisclub application type
sudo adduser tennisclub
You will be asked for a password. There is no strong password check here but you should be sure to use at least eight characters with at least one number, one special character and one upper case.
Your VM lives in the cloud and is exposed. Although you might not be storing your most sensitive information there's a more than reasonable chance that if you don't take reasonable security measures your VM will be hacked and used as a base from which to launch other malign attacks. In the modern era, the security of the internet depends on everyone taking precautions - particularly if you are the administrator of a cloud server. As part of the user creation process, you will be asked for additional information such as the user's full name, room number, and phone number. In the context of a user account created to host an application, these attributes are not as important and so can be left blank.
The Apache service runs as a user called www-data. In order that Apache web service can access files and data owned by the new user we have just created (tennisclub) we need to add the new user to the www-data user group. There is a lot to learn when it comes to Linux accounts and permissions, but all permissions are divided into a number of categories. There's 'owner', 'group' and 'world'. By adding tennisclub to the www-data group we can ensure that the Apache web server process can access the files it needs to present the data from our web application even though the files and data will remain owned and controlled by the tennisclub user.
To set the permissions of the home folder of the tennisclub account such that any new files that land in there will automatically inherit the permissions of the folder we need to use the setgit bit of the folder. If the setgid bit of the folder is set any new files landing in the folder will have the same group permssions as the parent folder. To add the user to the group, set the group permissions of the home folder, and ensure that those permissions are inherited execute the following three commands chained together.
sudo usermod -aG www-data tennisclub && sudo chown tennisclub:www-data /home/tennisclub && chmod g+s /home/tennisclub
then log in to the new account you have just created by typing
sudo login
You will be prompted for the username and password you gave when creating the account. Once logged in, to create public and private keys for this new account we use the same steps we did earlier.
ssh-keygen
This will create public and private keys in the .ssh folder. To change directory into this folder the keys - type:
cd .ssh
To enable the public key to be used to log in copy it to a file called authorized_keys by typing
cp id_rsa.pub authorized_keys
We can use the private key just as it is (openssh version) to connect using git. It's a good idea to give the private key an appropriate name to distinguish it from private key files you might have for other servers. With this in mind, take a copy of the private key file.
cp id_rsa tennisclubKey.private
To view the contents of this file type:
cat tennisclubKey.private
Stretch out your terminal window so you can see the entire contents of the file at once. Select the entire text of the file and then right-click on your selected text to copy the contents of the file.
Open your preferred Windows editor(eg. Notepad, Notepad++) and paste in the contents of the file. Save this as tennisclubKey.private (or something more meaningful to your app). Put the file somewhere safe and secure on your computer - possibly a folder that is backed up. Whenever you store a private key file remember that if someone else gets access to it they can hack your server but also if you lose access to it, you lose access to your server.
You now have a private key with which you can log in to the specific account that will be used to run your application. You will rarely, if ever, need to log in to this account as it's an application account. Keep the private key for this account stored and backed up securely somewhere. Many people have a dedicated my_keys folder which they keep carefully with their private key files.
To be able to use ssh to connect to github and pull your code github.com needs to be added to the known_hosts file in ssh. This is an extra layer of security that ensures you can only ssh into a server that is known to you. To add github to the known_hosts file type
ssh-keyscan -H github.com >> ./known_hosts
Before we can clone our github repo using ssh we need to add the ssh public key as a deploy key on the github repo. Because of the way public/private keys work, only people with access to the private key will be able to connect to the corresponding public key. This is git hub's way of securing the deployment process. To get a copy of the github public key type
cat id_rsa.pub
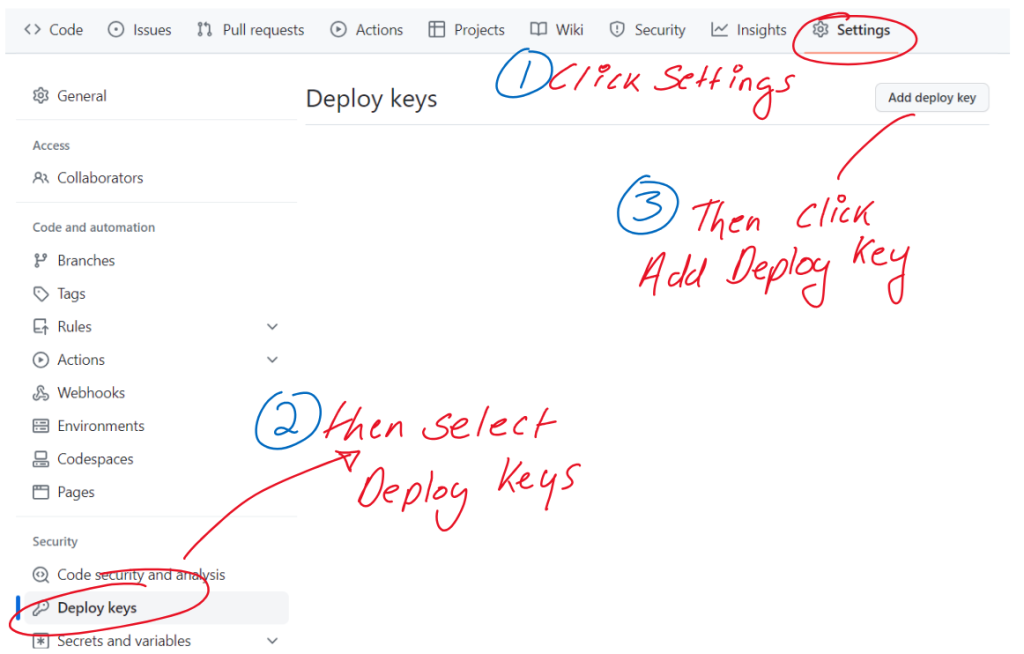
Now make sure your screen is stretched out so you can see all of the key and copy and paste it into a file in your preferred windows editor. From there open up your repo on github and click setttings - then Deploy Keys and Add Deploy Key
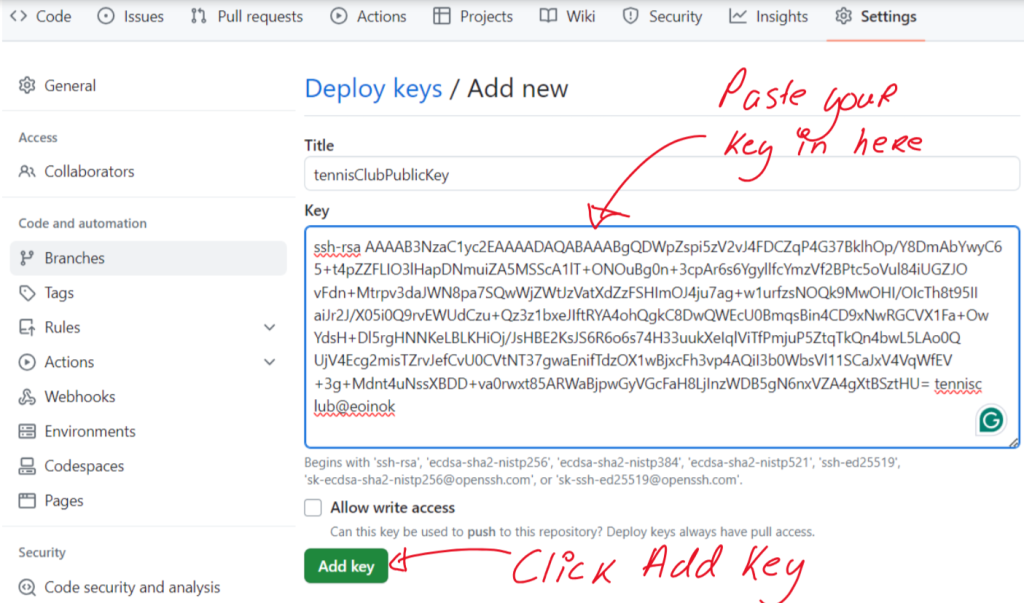
Then paste in the contents of your public key here
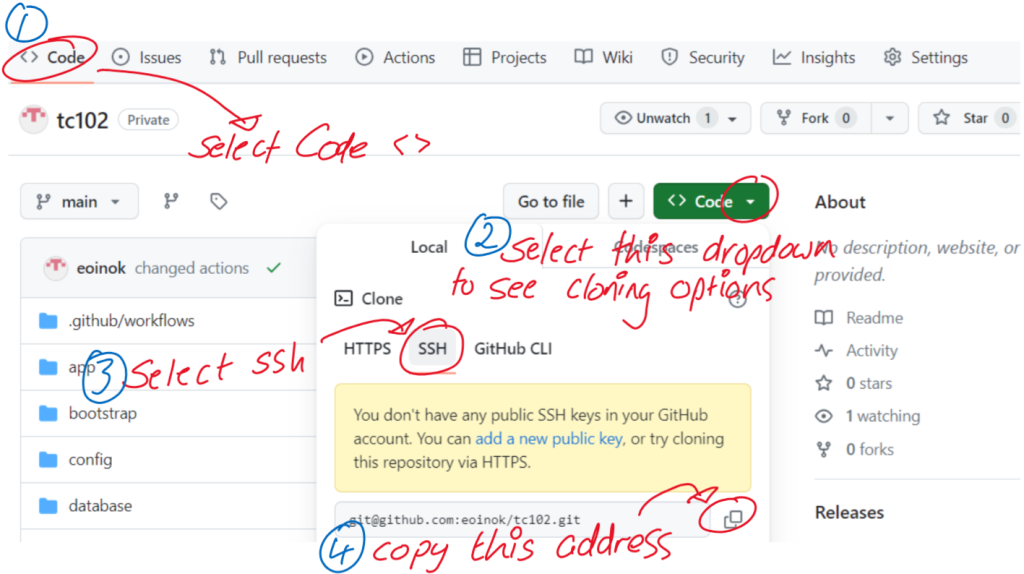
Now that we have added the deploy key we are ready to clone the repo. Rather than cloning using http which we would normally do we will be cloning using ssh. To get the precise command to do this return to the "Code" page of your repo and select the address of the repo to use when cloning using ssh.
To clone the repo into the home folder of the account you set up type
git clone git@github.com:yourgithubid/yourrepo.git
Before testing your application we need to use composer to pull down all the packages which were ignored in the .gitignore file and therefore not pushed into the repo. To do this type
cd yourreponame
This will change directory into the newly created folder named after your repo. Then type
php composer.phar update
This uses Composer to pull down all of the packages that are listed in your composer.json file.
Setting up a Symbolic Link from the webserver root to our Home folder
We now have all the files we need for our Laravel application, the only problem is they are not in the root folder of our Apache web server (/var/www/html). No problem, we can just create a symbolic link. A symbolic link or symlink is like a virtual folder that we can create in any location but that will point at a different folder somewhere else in the filesystem. The symlink folder will behave as if all the folders, subfolders and files were really in the location of the symlink. This is very handy. To create a symlink in /var/www/html we need to be logged in as the root user. To do this simply logout of the tennisclub user - type
logout
Then, to create the symlink type
ln -s /home/tennisclub /var/www/html/tennisclub
You should now be able to see your laravel application running under Apache. To do this visit http://100.100.100.100/tennisclub/server.php/. Where 100.100.100.100 is the IP address of your server. This should bring you to the home page of your application. If you need to visit a particular route or page you have scaffolded, put this after /server.php/ in the URL. So in my case http://100.100.100.100/tennisclub/server.php/members
Now that we have our application live in the cloud. You can give yourself a pat on the back having got this far and take a well-earned break. In the next post, we will add node and NPM (node package manager to our cloud VM).