Before you do anything you need to update your VM. A new Ubuntu VM will typically come with just the basics of software installed. In order to secure the VM, we will need to install certain software.
Installing software on a Linux cloud-hosted VM is very easy. To do this you typically use one of several dependency package management systems such as Composer (the dependency management system for PHP which is described in the section on using 3rd party components). There are a number of popular dependency package management systems which are popular on Linux such as Yum and apt. We will use apt. Before we can go any further with apt we need to make sure our VM is up to date with all the latest packages on which our VM depends. To do this type
sudo apt update && sudo apt upgrade -y
Apt "update" gets a list of updateable packages and "upgrade" installs them. Even though you have just spun up a brand new VPS this is no guarantee that all of the packages which make up the Linux Ubuntu OS installed on it will be the latest ones. That's how fast things move these days. Stringing two commands together using a && is yet another handy feature of the Linux command line. Installing these packages may take a few minutes.
To secure our VM we will have to generate a public/private key pair. To do this we will use ssh-keygen. This is a command-line tool built-in to Linux which allows for the generation of key pairs. To generate your keys type:
ssh-keygen
You will be prompted for filenames to use to store the key files. You can just press enter here to choose the default filenames. You will also be prompted to enter a pass-phrase to further protect your key. If you are confident you can maintain your key file stored in a secure location this might not be that important. Click enter to leave the pass-phrase blank here.
ssh-keygen generates keys in the PEM style whereas the ssh-client we will use, putty, uses PPK style keys. To convert this file we will need to install putty-tools - type:
sudo apt install putty-tools
Folders starting with a dot are hidden on Linux but you can see them with the right command switches type
ls -al
This will display all the folders in your current folder. Change directory into the folder containing your newly generated keys
cd .ssh
Type ls -al again. This will list the files in the folder. These are your newly generated key files for the root user. Every user on Linux has a home folder. If there is a .ssh folder within the home folder containing a file called authorized_keys then the operating system will attempt to validate the account using this public/private key pair. The authorized_keys file should contain the public key file which is the encrypted pair match of the private key file. The only way someone can gain access to that account is if their ssh login process attempts to use the private key which corresponds to the public key contained in the authorized_keys file. Depending on the OS, and the version of ssh-keygen you are using, the authorized_keys file may or may not have been created. The other two files present are normally id_rsa, the private key and id_rsa.pub the public key. If the authorized key file is not there then go ahead and create it by copying the id_rsa file as follows.
cp id_rsa.pub authorized_keys
The following command will convert your PEM style key into a PPK format which can be used with putty on Windows.
sudo puttygen id_rsa -o myFirstVPSKey.ppk
I've called this new private key file myFirstVPSKey.ppk but you can choose something more meaningful to you. I generally name my key files after my server. When you have come to love Linux as much as I do you will need to be able to readily identify your keys in the multitude of keys you possess.
Now that you have a ppk file you can use it to login using putty without using a password. If you are familiar with WinSCP you can download this file. To avoid having to download the file you can view the file in the terminal window and copy and paste the text of the file into a Windows editor such as Notepad or Notepad++. This file can then be saved to a secure location on your Windows PC and used with putty to login.
To do this - stretch the window of your terminal to a large size and display the entire contents of the screen by typing
cat myFirstVPSKey.ppk
Select all the text from the window and right-click on the selected text. This will copy the text to the paste buffer. Open notepad on Windows and paste the file contents in. Save the file locally to a secure location as myFirstVPSKey.ppk
Now open putty. Open your saved session which contains the correct IP address of your VM.
Select Connection - SSH - Auth from the Category section as follows:

Click the Browse button to find your locally stored ppk file.
Now the next time you log in, you will not be required to give a password.
The final important step necessary to secure your VM is to disable password authentication so the only way to login is to use public-private key encryption. This will massively reduce the risk of your server being hacked.
To do this you will need to edit a config file. Linux users generally have their preferred editors and will happily debate the merits of their preferred editors. Personally, I prefer "vi" for the simple reason that it's the one I started using all the way back in 1990. To a typical Windows user, vi would seem very mysterious. If this is your first foray into Linux I suggest using Nano.
To edit the sshd_config file using nano type
sudo nano /etc/ssh/sshd_config
If you type CTRL-W you will bring up the search command in nano. Search for the word password and you should find the line
PasswordAuthentication yes
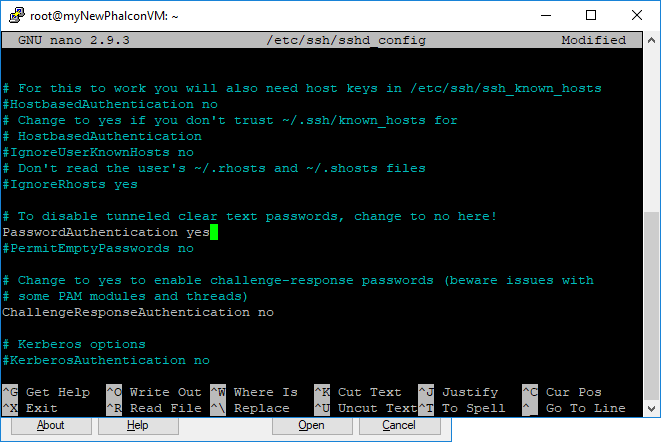
change this to
PasswordAuthentication no
and type CTRL-X to exit. You will be prompted to save the file - select "Y" for yes and save the file.
The sshd service has settings mainly in the sshd_config file but services organise the settings to run in a particular order. They do this by including other files together with the config file and naming them according to a numbered hierarchy. In the case of the sshd service the additional settings files are stored in the subfolder sshd_config.d. Change into this folder and examine the files in there to make sure there is no over-ride to the PasswordAuthentication setting.
cd /etc/ssh/sshd_config.d
Open the file in there by typing
sudo nano whatever-the-file-is-called
If you find a setting PasswordAuthentication yes put a comment at the beginning of the line by inserting a hashtag. This will nullify the setting. Then save the file by typing CTRL-X. You will be prompted to save the file - select "Y" for yes and save the file. Now type:
sudo service ssh restart
This will allow the service to pick up on the changes in the config file. Now you can only log in to your VM using public/private key encryption methods. Your VM is now secure.