Once multiple images have been uploaded for an Entity in the database we need a simple way to display them without completely rebuilding the user interface. A bootstrap carousel is an ideal way to display multiple images. For the purposes of this example, we use the show.blade.php view and adapt it slightly to show the pictures for each member.
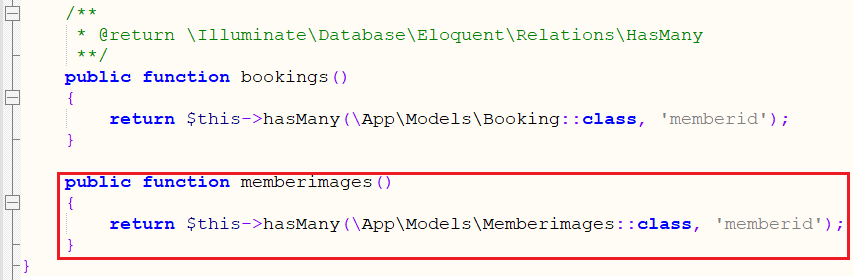
Before we go further we need to ensure that there is a hasMany( ) function in the member class which will allow us to join the memberimages using simple object arrow notation. These hasMany( ) and belongTo( ) functions are normally automatically added by the scaffolder to the model classes where it identifies a primary-key/foreign-key relationship. In this instance, the hasMany( ) function may not be there as we added the memberimages table later. Edit the file app/Models/member.php. Add the following function down at the bottom of the class.
    public function memberimages()
    {
        return $this->hasMany(\App\Models\Memberimages::class, 'memberid');
    }
Note the existence of the bookings() hasMany() function which was generated by the scaffolder.
This function acts like a magic function - now we can refer to the memberimages of the member by simply using the arrow notation like any other object attribute. What's going on behind the scenes is effectively a SQL join but done very neatly from now on. To leverage this, edit the app/Http/Controllers/memberController.php file and modify the show function as follows.
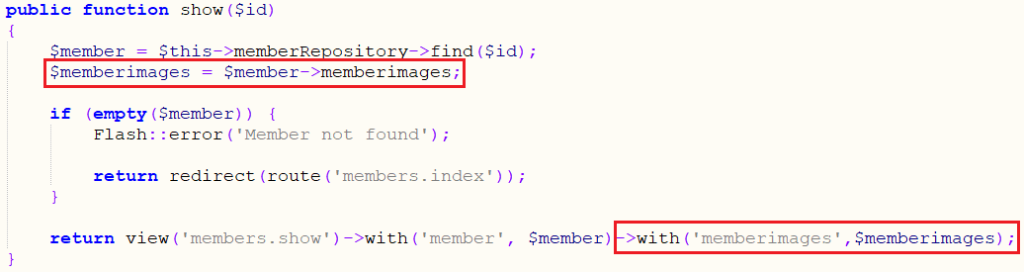
The line
$memberimages = $member->memberimages;
uses the hasMany( ) function in the member Model class to join the memberimages Class based on their primary-key/foreign-key relationship. This will pull in all the images for that particular member, store them in an array $memberimages. The snippet
->with('memberimages',$memberimages);
will then pass that variable to the view so the images can be displayed. Now that we have modified the show( ) function we can add a Bootstrap carousel to the corresponding view to do this, edit the /resources/views/members/show-fields.blade.php and add the following code at the bottom of the file.
<script src="https://maxcdn.bootstrapcdn.com/bootstrap/3.4.1/js/bootstrap.min.js"></script>
<div class="container-fluid">
    <div id="thisCarousel" class="carousel slide" data-ride="carousel">
    <!-- Indicators -->
    <ol class="carousel-indicators">
      <li data-target="#thisCarousel" data-slide-to="0" class="active"></li>
      <li data-target="#thisCarousel" data-slide-to="1"></li>
      <li data-target="#thisCarousel" data-slide-to="2"></li>
    </ol>
      <div id="thisCarousel" class="carousel slide" data-ride="carousel">
        <!-- Images -->
        <div class="carousel-inner" role="listbox">
            @foreach($memberimages as $memberimage)

              <div style="padding-bottom:20px" class="item @if($loop->first) active @endif">
                <img src="data:image/jpeg;base64,{{ $memberimage->imagefile }}"
                    style="width:45%;height:350px;" class="img-responsive center-block">
                <div class="carousel-caption" style="padding:0;top:auto;bottom:0;color:black">
                  <h2>{{ $memberimage->description }}</h2>
                </div>
              </div>
            @endforeach
        </div>
        <!--controls -->
        <a class="left carousel-control" href="#thisCarousel" data-slide="prev" style="background-image:none;color: black;">
          <span class="glyphicon glyphicon-chevron-left"></span>
          <span class="sr-only">Previous</span>
        </a>
        <a class="right carousel-control" href="#thisCarousel" data-slide="next" style="background-image:none;color: black;">
          <span class="glyphicon glyphicon-chevron-right"></span>
          <span class="sr-only">Next</span>
        </a>
      </div>
    </div>
</div>
Note the first line of this block of code includes a link to a CDN hosted bootstrap.min.js. This javascript allows for the processing of the left-right slides on the carousel, so if your carousel isn't moving it's because this package did not load.
The image carousel has been styled to appear as simple as possible. The inclusion of the img-responsive center-block classes with a specific height (350pix) and a relative height (45%) will allow the images to display consistently but this should be used carefully as images are effectively being resized on the fly. If the height width ratio of the image does not roughly match this ratio the image will appear distorted.
There are many explanations to be found online as to how to customise a boostrap carousel. There are also PHP and Laravel packages which will allow you to programmatically pre-process and post process the image. My preferred option to address this issue would be to use a jQuery or other Javascript plugin at the point the User is uploading the image to allow the user to crop the image into a consistent size which will provide a more consistent view and better image quality.